VSTO & .NET & Excel

January 9, 2013

SamLogic Visual Installer 2012 available in English!

Filed under: .NET & Excel, COM Add-ins, Excel, Installation Tools, SQL Server, VSTO & Excel — Dennis M Wallentin @ 3:18 am

In some earlier blog articles I have written about and mentioned Visual Installer 2012 from SamLogic, a Swedish Company. The key feature for Excel developers is that Visual Install 2012 can create professional installation programs for all Excel files and in particular for native add-ins as it can both install/activate as well as uninstalling add-ins in a very smooth way. Of course, it can handle both 32 bits and 64 bits versions.

For more information please see my blog article: Install and Activate Add-ins in Excel with SamLogic’s Visual Installer

The good news is that Visual Installer is now available in English too.

Screen shot of the Main Window of Visual Installer 2012:

VS2012

Visual Installer also includes a script commands that gives more control of the various processes upon installing and uninstalling softwares.

The following screen shot shows the help section for the script command to get any native add-in activated:

Excel Add-in

For more information about Visual Installer 2012 please see the following links:

Please note that the Excel add-in’s feature is only available in the professional version.

Kind regards,
Dennis

January 6, 2013

Set up a GMail E-Mail Account in Outlook 2013

Filed under: E-Mail — Dennis M Wallentin @ 1:53 am

The blog article’s content is beyond what I usually cover in this blog. However, since I know that many today have a GMail E-mail account I thought this would be of common interest.

To add a new GMail E-mail account we must first select the File tab from the Main Window in Outlook 2013. Next, click on the Info button and click on the + Add Account. In the first dialog in the Wizard we select the second option as the below screen shot shows:

OL1

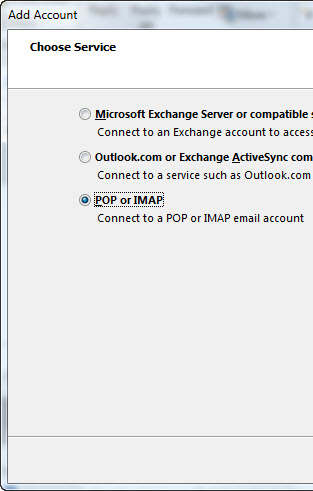
Click on the Next button and we get the next dialog as the following screen shot shows. Select the option POP or IMAP and click on the Next button.

OL2

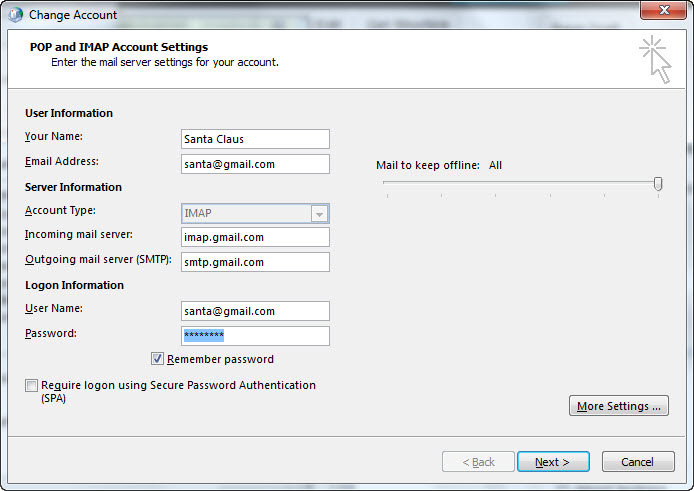
In the next step we fill in all the details as the below screen shot shows. As we can see we select the account type IMAP. We use the mail.gmail.com for the incoming server and for the outgoing server we use the smtp.gmail.com.

OL3

In the next step we click on the More Settings… button. In the new dialog we select the tab Outgoing Server and fill in the required information as the following screen shot shows.

OL4

The final step is to click on the last tab, Advanced, and write the following information as the below screen shot shows:

OL5

After that You just click on the OK button which gets You back to the main dialog. Click on the Next button and that’s it!

Congratulations, now You have successfully added a GMail E-Mail account to Outlook 2013!

Kind regards,
Dennis

Blog at WordPress.com.